The first step when working with a new process, printer or printing substrate is to establish a base exposure or base printing time. This is the amount of exposure needed to make your sensitised paper completely black in areas on your digital negative with no ink on them. Once you have calculated this time, you will always use it and only ever change it when any of these things change
- Paper
- Negative OHP Film
- Coating method
- How dry your paper is when exposed
- Humidity
- Temperature
- Sensitiser
- Amount of sensitiser per mm2
- Developer
All of these can affect the exposure time to some extent.
Keeping Notes
At this point I will strongly suggest you keep a note of everything you do. I didn’t keep a good note at first and ended up having to run things again. If you’re planning on making a habit of this alternative processing stuff, note taking will help you in the future – guaranteed.
Stepped Exposures
Manual Method
You could make multiple exposures by masking of your paper a bit at a time, increasing the exposure by a third of a stop each time. Here’s a table of times you could use.
| min | sec |
|---|---|
| 4' | 0" |
| 5' | 2" |
| 6' | 21" |
| 8' | 0" |
| 10' | 5" |
| 13' | 42" |
| 16' | 0" |
| 20' | 10" |
| 25' | 24" |
| 32' | 0" |
Then follow these steps
- Divide your sensitised strip into 10 areas (you can mark them with pencil).
- Place a sheet of OHP film on top of the sensitised paper.
- Make a hole in a piece of card that only shows the first step.
- Check the card is big enough to cover all of the other steps even when placed on the last step.
- Expose each strip for the amount of time in the above list.
Stouffer Step Wedge Method
Alternatively, you can use something called a Stouffer transmission wedge. This is a transparent strip with a set of increasingly dark steps on it. You can do the above test in one step.
- Place a sheet of OHP film on top of your sensitised paper
- Place the Stouffer step wedge on top of this
- Expose for 32 minutes
The result should be the same as the above but instead of two and a half hours to moving a hole across and exposing, everthing is over in half an hour.
If you know your lights are pretty powerful, you might get away with exposing for 16 minutes or less. Some UV exposure units are very slow though and could take over 40 minutes.
Evaluating the Results
You should now have something that looks like the top strip in the image below.
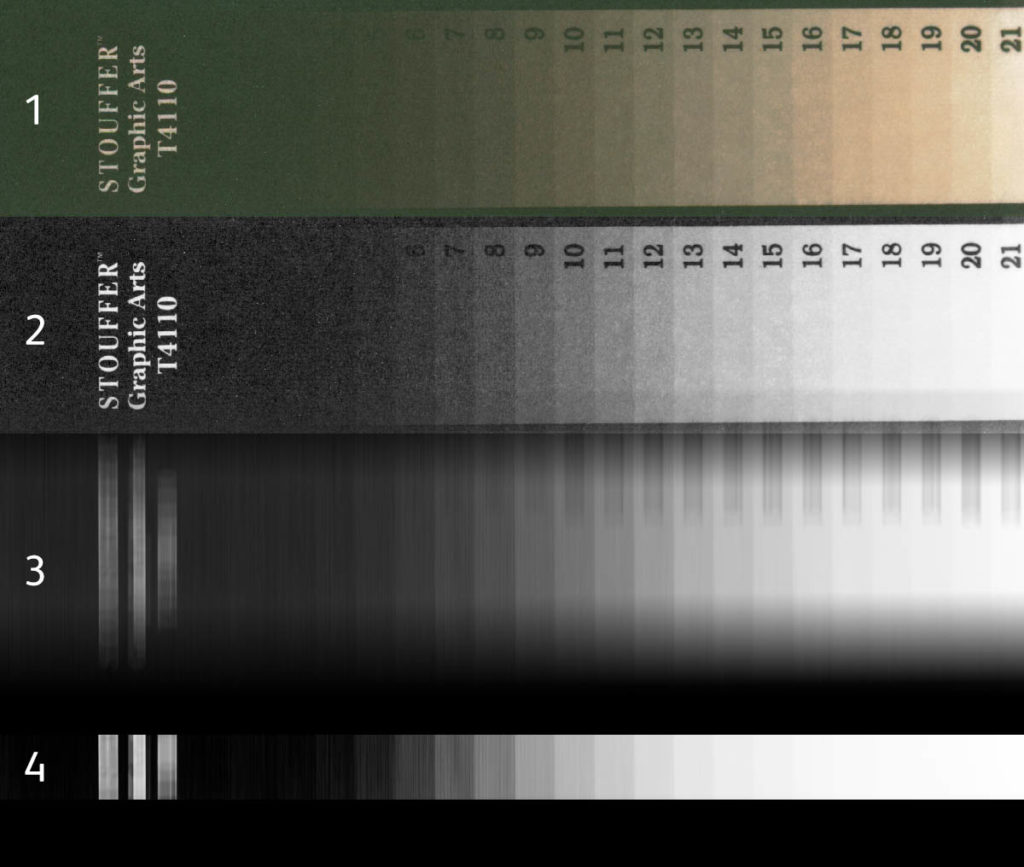
You can probably get a good reading just from looking at the print but if you want to analyse things a little closer you can scan the image in and convert to black and white
- scan the image in
- convert to black and white, set the black point and use a curve boost to increase contrast
- use motion blur (vertically) to get smooth out some grain without getting rid of step edges
- set the black point and boost contrast again
Now you have the problem of choosing which step is best! For me, the last differentiated steps are from step 3 to step 4, 3 being pretty close to black. Because each step is a third of a stop, this means we need to decrease the exposure by a full stop which means halving the exposure time. Because we tested this at 12 minutes, our exposure time with the LED unit for this process (Van Dyke Brown) is 6 minutes
More Accurate Blurring
Unless you’re really, really anal and know your Photoshop then ignore this section.
Getting an accurate blur in Photoshop isn’t easy. The only real way to get a completey accurate average is to select each step and use Filter > Blur > Average. There is a way though (it may be quicker to do the filter > blur > average trick though).

- measure the width of a single step (in our case 119 pixels) (To make it accurate I measured the width of 10 steps and divided it by 10)
- Crop the left hand edge off the canvas off to give us a whole number of steps. In our case we have 21 steps at 119px each equals 2499px.
- Crop the top and bottom so we only have ‘steps’ and no numbers or outer edges
- Resize the image to 21px by 1px using nearest neighbour and resize back to the original size (using nearest neighbour still)
- Our steps should now be averaged perfectly. In my case here I pasted the smoothed steps back onto my original scan.
- You can now convert to black and white, set the black point and increase the contrast.
In the bottom image I’ve also converted the number section to black and white, set the black point and boosted contrast. (just as a reference)
Here I can see that although the step from 3 to 4 looks like the best choice, step 1 looks like step 4. So perhaps steps 2 and 3 being darker is an anomaly. If this were so then the step from 3 to 4 would be a better choice.
If this were so then the step from 4 to 5 would be a better choice and in this case, instead of 8 minutes being the final calculated time it would be 6 minutes and 21 secs (I used the table of exposure times above to work out 4 steps down from 16 minutes).
It might be worth doing a couple of tests of this exposure time. Any errors should show up in the following calibration steps.
Gotchas
Your coating method for a strip of paper is different from your coating method for a full sheet
You will inevitably have a different amount of coating if you’re using a small strip of paper instead of a big sheet. Even if you calculate the amount of sensitiser perfectly, the amount soaked into the brush could differ. This shouldn’t make too much of a difference but do your best to make the process as similar as process. I would recommend coating a full sheet like you would normally do and then cut it into test strips.
Rushing your Drying
In a rush to get things going, you force dry your test strips and get a wrong exposure time. Any humidity (or lack of) in the paper could affect the time. Try to make the test strip process as close to the real process as possible
Step 1 on a Stouffer step wedge is only 1/6 stop
So the only really accurate Stouffer wedge for this process is T4105 which is itself in 1/6 stops. If you have a 1/3 of a stop wedge then you’re final exposure time will be 1/6 a stop darker. The result will be a print that is a little darker than you expected so perhaps it’s best to err on the lower exposure than the higher if you can’t decide.
Make a Note of Everything
Just to repeat myself, make a note of all of the variables listed so you can always come back to a process and know the exposure time.
Thought the posting about the step wedge was amazing, just starting salt and platinum printing. Really helpful. How current is the information in the posting? Really interesting reading / thanks Mark
Mark hamilton on February 18, 2017 at 10:15 pm
Thought the posting about the step wedge was amazing, just starting salt and platinum printing. Really helpful. How current is the information in the posting? Really interesting reading / thanks Mark